|
Sand
Land
| Class
Setting |
 The
students are divided into groups of 4-5. The instructor has
prepared one sandbox for every group. It is better if the sandboxes
are prepared but kept aside, so that the students do not get
distracted. The instructor has one sandbox to illustrate how
it works. It takes 1 1/2 hours to complete the two activities
described in this module. A modification, described below, allows
the instructor to complete the lesson in 1 hour. The
students are divided into groups of 4-5. The instructor has
prepared one sandbox for every group. It is better if the sandboxes
are prepared but kept aside, so that the students do not get
distracted. The instructor has one sandbox to illustrate how
it works. It takes 1 1/2 hours to complete the two activities
described in this module. A modification, described below, allows
the instructor to complete the lesson in 1 hour. |
| Script
of class interaction |
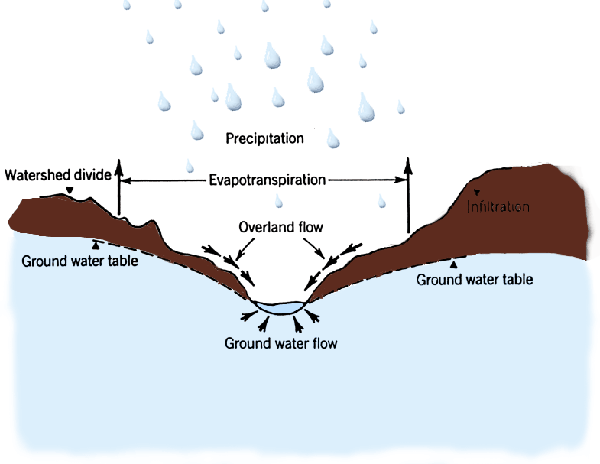
Recap
the previous discussion of watersheds. (Hand-Land)
|
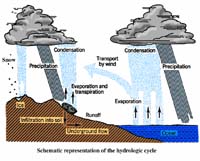
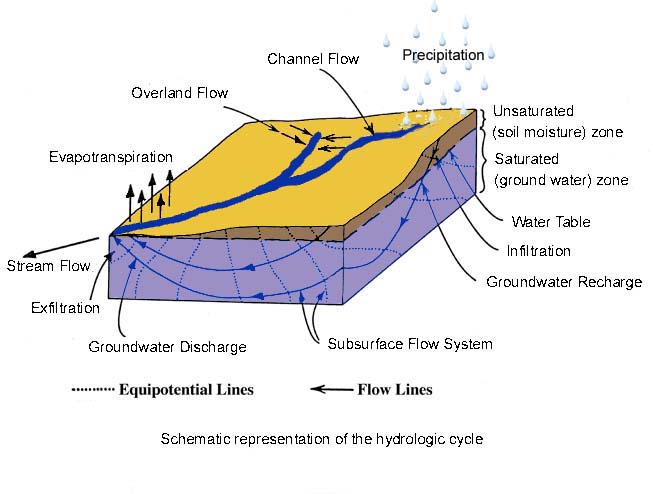
Introduce
the water cycle
drawing.
|
| click to
enlarge |
 |
Introduce the concept of a model.
|
Explain
how this model relates to a watershed and the water cycle.
|
Where
does rain water come from?
|
Where
does rainwater go?
|
Are
you related to the water cycle? If so how?
|
Are
trees and lawns related to the water cycle? If so how?
|
Where
does rain water go to?
|
How
does rainwater effect the soil?
|
What
happens to water and other liquids, once underground?
|
How
do humans change the affects of rain on soil?
|
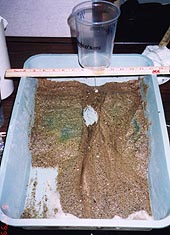
Activities
Activity
1: Understanding the model
Overview
- Fill the
1/8"-hole, drip container with water to about 4.5 inches high,
covering the hole with your finger.
- Carefully
place the container on the ruler, which spans the back of the
Sand-Land pan's rim.
- Remove your
finger to let water drip for 1.5 minutes.
Water will flow over and through the soil (forming stream-like
erosion patterns) and eventually through the hole of the pan into
the collection bucket.
After 1.5 minutes, cover the hole with your finger, mark the height
of the water, and remove the drip container.
Notes:
The higher the level of the water in the drip container, the faster
the water will flow. It is a good idea to make a separate measurement
of how quickly water flows out. It helps to fill the drip container
to the brim and mark in advance the level of water at 1 and 1.5
minutes. By repeating the experiment with the 3/16"-hole drip container,
different erosion patterns can be observed as water flows faster.
- Introduce
the Sand-Land Model concept and materials to the students.
- Have each
team of students set the pan at an angle using the blocks to simulate
a slope condition.
- Explain to
students how to they will model "rain" by letting water drip from
a container onto the soil slope in the sandbox.
- Explain that
the 1/8" hole simulates a smaller rainstorm than the 3/16" hole.
- Ask each
group to balance the drip container on the pan's rim and the ruler
being careful to center it on the marks made previously on the
ruler.
| Activity
2: Developing a hypothesis from previous experience |
| Ask students
to make a drawing of what is going to happen when rain starts
falling on our Sand-Land Model |
Where
is the water going to go?
|
What
is the water going to do to the sand?
|
Think
about the relationships that may exist in our model: soil
versus water, static vs. dynamic, straight vs. curved, additive
vs. subtract, constructive vs. destructive, made by humans
vs. made by nature.
|
| |
|
Activity
3: Investigation, running and observing the model
|
- Explain
how each group will simulate rain and assign specific roles
to team members (a "cloud", a timer and two or three observers).
- The
"cloud" rains for 1.5 minutes (places the drip container
on the supports and removes finger from the hole), until
the "timer" tells the cloud to cover the hole. Meanwhile,
the observers are paying attention to what is happening
with the soil and the flowing water.
- The
"timer" keeps time until no more water drips from the container
(when the drops slow down significantly, say until two consecutive
drops are separated by 2 minutes).
|
| |
| |
| Activity
4: Evaluating our hypothesis and investigation |
- Ask
students to mark the boundaries of the existing stream channel
with 5-6 toothpicks.
|
- Ask
students to draw what actually happened on the tracing paper
on top of previous sketch in the activity
card.
| click
to enlarge |
 |
|
- Ask
students to write a brief description (3-4 sentences) of
their observations in their notebooks.
|
- Ask
students to place the "sandbox" in the water cycle, by marking
the components of that we are modeling on the water cycle
schematic.
|
- Have
teams share their observations during class discussion,
prompted by questions such as:
|
How
did the water move?
|
Did
it move any different than what your sketch?
|
What
happen to the soil?
|
How
is our Sand-Land model different than the real world?
|
Are the
differences found in the soil?
|
Are the
differences found in the way the water moves? (tug question:
water cycle)
|
Science Prerequisites
Students have already discussed the watershed concept in class.
Students are familiar with the idea of "modeling" aspects of real
phenomena with simple physical experiments.
Science Themes
It takes time for phenomena to evolve in nature. Human activities
can go on for quite some time before we notice their impact on the
environment (e.g., air pollution, groundwater contamination, global
warming).
|
