Hand
Land
Extension Two: Hand Land 2
|
Extension
1: What is in the watershed?
|
Overview
After students experience the general characteristics of a
watershed, they look at a local watershed map and describe
the major land use elements in a watershed
|
|
Objectives
Students will describe the physical terrain of a local watershed.
Potential Homework assignment.
|
| Materials |
Click
to enlarge |

-
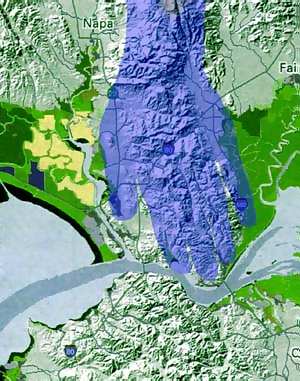
A USGS
(United State Geographical Survey) map which includes watershed
boundary line,
topographical information, streets and municipalities. (right)
- One large map or overhead projection.
- Smaller map handouts for each child.
|
Lesson
Plan
|
|
Class
Setting
Teacher works from the front of the classroom and students
are primarily seated. Casual discussion and assistance is
encouraged once the activity begins.
Script of Class Interaction
Lecture: Cities are made up of many different kinds
of places which we can recognize on a map. What do the children
recognize?
Display materials: (overheads, maps, models etc)
Activity Description
Teacher shows the large map and explains the map's symbolic
key. Identify 3-4 familiar landmarks. Then asks them to
identify some landmarks that they might know. This gets
marked on her map. Assignment: Students are asked
to identify 5 areas they know on the map; schools, homes,
parks, freeways, railroads, playgrounds, shopping areas,
streams, etc.
|
What is
in the Watershed?
How big is the watershed?
How many towns do you recognize in the watershed?
Is the area mostly homes, factories, business,
farms, or forest?
How do you describe the watershed?
|
|
Wrap-up
Present them with a map from a more rural town. Ask them
to take it home and see if they can identify 3-4 familiar
landmarks on that map. Is it mostly homes, factories, business,
farms or forest?
|
Extension
One: What is in the Watershed?
| Extension
2: Hand Land 2 |
| |
click
to enlarge |
|
 Overview Overview
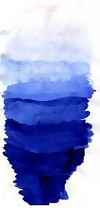
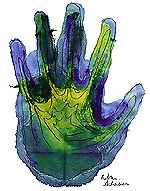
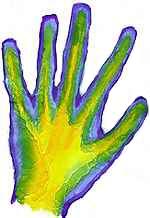
Hand Land 2 focuses on topographical representation. In
order to represent the high and low areas of a watershed
accurately the students practice graduating tones of color
using watercolor paints. Areas most saturated with color
will represent the lowest elevations, areas more saturated
with water will represent the highest elevations.
|
|
Objective
Students use contour lines and gradation to create a watercolor
painting version of the topographical map of their Hand-Land.
|
| Materials
|
Kozo
or Sumi-e paper
Primary colors
of water color paints
(yellow, cyan, magenta)
Brush
Water
|
|
Lesson
Plan
Class
Setting
Each student is supplied with paper, primary colors, a brush
and water. The teacher outlines the process then guides
them in their work.
Script
of class interaction
The teacher prepares some water color paintings from at
least two different cultural backgrounds. If possible the
images should present water/landscape imagery. Display materials:
Slides or overheads of watercolor paintings and techniques.
 Activity
Description Activity
Description
Show some watercolor paintings, and explain how watercolor
paint is used. Explain how we use and combine primary colors.
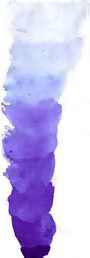
Provide a specific demonstration of gradation painting.
(Illustrate how to use paint to create a gradation of light
to dark tones, by varying the amount of pigment in relationship
to water.)
Caitlin
McCalla
|
| Activity
1: Understanding the process |
- Wet Kozo or Sumi-e paper with a large watercolor brush
and water.
- Select
one color and touch a drop of the watercolor to the wet
area.
- Observe
the flow of the watercolor into the wet area of the paper.
- Saturate your
brush with one color paint.
- Pull
the saturated brush across parallel
lines of the wet paper, as the brush runs
out of color dip it into water, and continue the process.
Notice how the color becomes lighter as it loses pigment.
- Practice graduating the tones of one watercolor from
its darkest or most saturated color to its lightest or
least saturated pigment. Learn to regulate the amount
of water and pigment to control the gradation.
- Share the students' process when they are painting.
|
| |
Activity
2: Investigation and discovery with water color
Application of graduated watercolor
pigment watercolor pigment to Hand Drawing |
- Observe
the original Hand Land drawing (Hand
Land 1) you made with concentric patterns of its outline.
- Locate
the highest areas within your drawing and the lowest areas
of the topography.
- Wet
the drawing of the hand on Kozo or Sumi-e paper with a
large watercolor brush and water.
-
Selectone or at the most two color(s) and touch a drop
of the watercolor to the wet area.
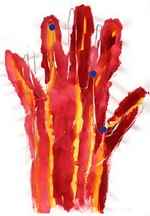 
- Control the watercolor by painting each concentric shape
with a specific graduated tone of color until the entire
drawing represents several "watersheds" with varying topographies.
- Repeat this process until you have mastered the effect.
- Paint a Hand-Land.
| Lenise
Bailey |
Robin Scheines |
|
| Activity
3: Evaluation and Wrap-up |
- Share the students' works when they are finished painting.
|
- Ask students
to write a brief description (3-4 sentences) about the
gradation painting.
Were they
surprised in the way the color moved?
Does the way water moves on a paper have anything to do
with the way rain moves over land?
Which of
the two art-works is more interesting?
Which of the two tell us more about watersheds?
Which of the two is the most beautiful?
|
| Prerequisites
|
Students
have already experienced painting gradation.
Students are familiar with using watercolor paint.
|
| Art
Themes |
Using
gradation to describe high and low points as a two-dimensional
graphical representation.
|
|

|